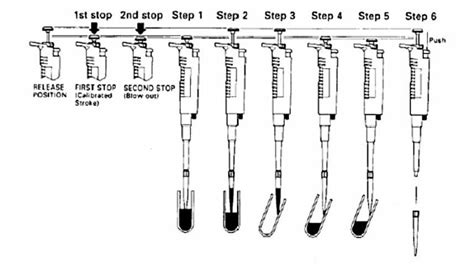
Reading a micropipette can seem intimidating at first, but with practice, you'll become proficient in no time. Accurate measurement is crucial in scientific research, medical testing, and other laboratory settings. A micropipette is a valuable tool in these fields, allowing users to precisely measure and dispense small volumes of liquids.
Micropipettes have become an essential tool in laboratories due to their accuracy and precision. However, understanding how to read a micropipette can be a bit tricky for those who are new to working with these instruments. In this article, we will walk you through the steps to read a micropipette accurately.
Understanding the Micropipette
Before we dive into the steps, let's take a moment to understand the different parts of a micropipette. A typical micropipette consists of the following components:
- The handle: This is the main body of the micropipette.
- The plunger: This is the button on top of the handle that you press to dispense the liquid.
- The tip: This is the disposable part of the micropipette that comes into contact with the liquid.
- The volume display: This is the window or digital display that shows the set volume.
- The volume adjustment dial: This is the dial that you turn to set the desired volume.

Step 1: Set the Desired Volume
The first step in reading a micropipette is to set the desired volume. To do this, locate the volume adjustment dial on the handle of the micropipette. Turn the dial clockwise to increase the volume or counterclockwise to decrease the volume. The volume display will show the set volume.
Volume Display Types
There are two types of volume displays on micropipettes: analog and digital. Analog displays use a series of lines and numbers to indicate the volume, while digital displays use a numerical display.

Step 2: Identify the Volume Units
The next step is to identify the volume units on the micropipette. Micropipettes typically measure volumes in microliters (μL) or milliliters (mL). Make sure you understand the units of measurement to avoid errors.
Conversion Between Units
If you need to convert between units, remember that 1 mL is equal to 1,000 μL. For example, if the micropipette is set to 100 μL, this is equivalent to 0.1 mL.

Step 3: Read the Volume Display
Now that you've set the desired volume and identified the units, it's time to read the volume display. For analog displays, align the pointer with the desired volume on the scale. For digital displays, read the numerical value on the display.
Accuracy and Precision
When reading the volume display, make sure to take note of the accuracy and precision of the micropipette. Accuracy refers to how close the measured value is to the true value, while precision refers to the repeatability of the measurement.

Step 4: Aspirate the Liquid
With the desired volume set and the volume display read, it's time to aspirate the liquid. To do this, immerse the tip of the micropipette into the liquid and slowly press the plunger until it stops.
Aspiration Techniques
When aspirating the liquid, make sure to use the correct technique to avoid air bubbles and contamination. Hold the micropipette at a 45-degree angle and slowly lower it into the liquid.

Step 5: Dispense the Liquid
The final step is to dispense the liquid. To do this, place the tip of the micropipette into the desired container and slowly press the plunger until it stops.
Dispensing Techniques
When dispensing the liquid, make sure to use the correct technique to avoid spills and contamination. Hold the micropipette vertically and slowly lower it into the container.


What is the difference between a micropipette and a pipette?
+A micropipette is a type of pipette that is designed to measure and dispense very small volumes of liquid, typically in the range of microliters (μL). A pipette, on the other hand, is a more general term that refers to any device used to measure and dispense liquids.
How do I calibrate my micropipette?
+Calibrating a micropipette involves verifying that the device is accurately measuring and dispensing the correct volume of liquid. This can be done using a calibration standard, such as a precision weight or a calibrated pipette.
What is the purpose of the plunger on a micropipette?
+The plunger on a micropipette is used to dispense the measured volume of liquid. When the plunger is pressed, it pushes the liquid out of the tip and into the desired container.
We hope this article has helped you understand the basics of reading a micropipette. With practice and patience, you'll become proficient in using this valuable laboratory tool. Remember to always follow proper techniques and protocols when using a micropipette to ensure accurate and precise measurements.
